It’s that time of year again! Some ice anglers have found success already while on the ice, but there are still a lot of locations across Montana that still have open water. Team Hippy Fish (TeM Hipe FySh) has a page on Facebook with some recent ice fishing photos, along with other fishing photography in the northwest.
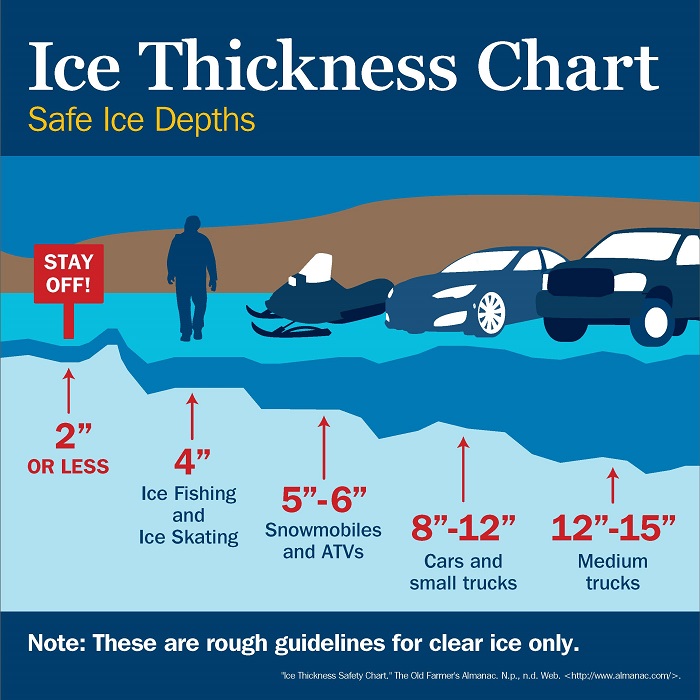
We can’t emphasize the importance of being careful out there. Below is an Ice Thickness Chart that has a rough estimate of safe ice depths. If there is any doubt in your mind that ice is not thick enough, it is better to stay off the ice. Be sure to check back to montanaoutdoor.com for the latest fishing reports to get the most recent ice reports.
Good luck ice anglers, and here are a few steps to follow (via Wikihow.com) before getting out there to gauge if the ice you want to get on is safe:
1. Recognize that ice will never be completely safe.
2. Create an emergency safety plan – Make sure you are dressed appropriately and are even wearing a lifevest if you are snowmobiling, also, be sure to have some dry clothes with you on hand in a waterproof container.
3. Recognize that determining the safety of ice is dependent on a combination of factors, not on one factor alone:
- Appearance of the ice – its color, texture and features
- Thickness of the ice – there are recommended thicknesses for different uses, which are set out below
- External temperature over a period of time and on the day
- Snow coverage
- Depth of water under ice
- Size of water body
- Chemical composition of water – whether water is fresh or salt
- Local climate fluctuations
- Extent of ice
4. Prefer ice that is checked by designated authorities on a regular basis.
5. Ask the locals.
6. Look at the ice to see if you can see any cracks, breaks, weak spots or abnormal surfaces and to identify the color(s) of the ice. You cannot rely on your eyesight alone.
7. Know your ice color meanings:
- Light gray to dark black – Melting ice, occurs even if air temperature is below 32°F (0°C). Not safe, its weak density can’t hold a load, stay off.
- White to Opaque – Water-saturated snow freezes on top of ice forming another thin ice layer. Most times it’s weak due to being porous from air pockets.
- Blue to Clear – High density, very strong, safest ice to be on if thick enough, stay off if less than 4 inches (10 cm) thick.
- Mottled and slushy or “rotten” ice – not so much its color but its texture. This ice is thawing and slushy. It is deceptive – it may seem thick at the top but it is rotting away at the center and base. Most prevalent in spring, may be showing signs of browns from plant tannins, dirt and other natural materials that are resurfacing from thawing. Not suitable for even a footstep.
8. Test the thickness of the ice. If you have already made your observations and you still feel confident, you will need to back this up by checking the thickness of the ice.
- Test with at least one other person (the buddy system). Wear a flotation suit or device and use ropes that your buddy can pull on if something goes wrong.
- Only go on the ice if the edge of the water body is firm. If it is slushy or cracking, it is unlikely to be safe to proceed as shoreline ice is the weakest.
- Chip the ice with an axe or hatchet to create a small hole in the ice, or use an ice auger (a special tool which drills into the ice), for measuring the thickness through. Use a measuring device to determine the thickness.
- Learn the thickness safety margins of ice. There are recommended thickness measurements for the safety of ice that you will need to establish to for each activity being undertaken. (N.B. These are recommended, not guaranteed.) Ice begins to be “safe” at around 4 – 6 inches thickness. Do not even walk on ice 3″ or less in thickness. However, even at a 9″ – 10″ thickness, there may be unforeseen hazards such as a flowing current underneath that is ceaselessly weakening the underside of the ice. In this instance, even the thickness is not a good indicator of safety, as the ice could collapse at any time
9. Understand that ice strength is not the same everywhere, not even on the same body of water. Also take the following into account:
- Location of the ice: is it on a pond, a lake, a stream or is there evident flowing water underneath it? Is there a flow into or out of the water body? This will give cause for concern.
- Constitution of the water: is it fresh water or saltwater? Sea ice tends to be weaker and needs greater thickness to support the same weight as fresh water. See the External Links below for more information on exact measurements.
- External temperature and season: temperature changes constantly. Beware microclimates in the local area. Mid-winter ice is bound to be a lot stronger than spring ice which is subject to rapid thawing and warming bouts of sunshine.
- Size and depth of the water body: larger bodies of water take longer to freeze than smaller ones.
- Presence of snow on the ice: snow can warm up the ice because it acts as an insulator; ice under snow is generally thinner and weaker than ice without snow.
- Weight on ice: what are you putting on the ice? Just you or you and a vehicle? There is a big difference in the weight distribution between a body and a snowmobile with said body on top.
10. Find alternatives when in doubt.