Being a practical outdoorsman without a lot of extra cash on hand has its disadvantages. But then again being a practical outdoorsman has some advantages too. Plenty of them, like finding thrifty alternatives to expensive things by building your own. Good drift boats are perfect for hauling gear down river while providing a safe and sturdy platform to haul trout in too. But many new drifters on the market are heavy and can cost $7,000-$15,000. Used boats are also expensive unless they are already so worn out that no one wants them anymore.
My friend John and I built a quality drift boat that is sturdy, lightweight and didn’t break the bank. It didn’t require a bunch of expensive tools or precision cutting either which is important for me because I don’t have the wood working skills necessary for elaborate types of boat designs.
Aside from picking the boat up to move it once in a while it wasn’t strenuous to construct our first boat instead, it was a fun project that anyone can do.
Things To Consider
When deciding on a boat style to build I considered important things like that most of my time fishing is spent alone but not always. I needed something that was easy enough for one person to handle but that could also hold up to three people and fishing gear.
Designing boats is not something I do on a regular basis so I used ideas from boat designer Paul Butler. Paul has created several stitch and glue boat designs from Kayaks and canoes to larger drift boats that are well suited for first time boat builders. This method doesn’t require precision cuts nor does it require master craftsmanship skills.
The plans were easy for a first timer to follow and although we didn’t follow every detail it served as an excellent reference guide. Paul has a website that is great even if you are just looking for design ideas but does sell design plans. Some do it yourselfers may enjoy the challenge of designing and laying out the patterns on their own but for $50 I was able to own instructions and template measurements that were well worth the money.
The next consideration for me was the cost of the project. Building boats can be expensive to do depending on the materials used. To keep the cost down I chose a stitch and glue boat design. I’ll admit that when I first heard the term “stitch and glue” I had my doubts but after some research I learned that the method is very solid and allowed me to build a 14’ drift boat for under $900.
I already owned a small utility trailer that I could modify to carry the boat easily. I used two 2 x 6 boards and wrapped them in old carpet fastened with fence staples. The boards were bolted to the rails on my utility trailer which was perfect for hauling the light weight boat. The boards can be removed in minutes keeping my trailer versatile but even without a trailer the boat is light enough that it can be hauled on a car roof.
Materials-plywood, epoxy, fiberglass tape
In order to build a lightweight boat that will hold up to real life fishing abuses the materials had to be carefully selected. I fish on rivers with narrow rocky bottoms and avoiding rocks and other obstacles isn’t always possible. Building a tough yet light-weight boat was my goal and it took some searching to find the right materials. I ordered all the wood materials from my local lumber yard but things like epoxy, fillers and fiberglass cloth and glass tape were ordered on line. Specialty boat building supply stores have everything needed for a stitch and glue boat but I noticed that prices vary widely for the same products. The differences in cost can be huge so I recommend shopping around to find the best deals. I used the West System® brand epoxy and it worked well for me.
The Fiberglass material is essentially heavy woven cloth material that cuts like canvas. The stiff properties needed for fiberglass boat building happen after epoxy is used to saturate the cloth and then it hardens.
To get started we needed a spacious room with good lighting and heat because it was winter. In the center of the room John built a work bench on wheels so we could move the project around easily. At a minimum a couple saw horses with 8’ long planks and a sheet of plywood should be used to build on. Elevating the boat is important and a few screws must be drilled through the bottom to hold the vessel in place during later steps.

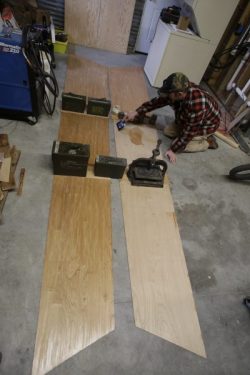
We used one and one half 4’x8’ sheets of 3/8” marine-grade plywood to create the bottom of the boat. The total length was 12 feet long and 4 feet wide. A center line drawn lengthwise began the project that would take us about 150 (75 each) man hours to complete. All measurements were taken from either side of the center line in 12 inch increments from bow to stern forming dots to connect with a pencil. The shape of the bottom was now traced out and then cut and edges sanded.
A doubler pad covered the seam and floor was allowed to dry over night. The floor was covered with fiberglass on the top and bottom using epoxy to cover the material which created a tough and water proof bottom. The sides were made in the same way but without the added fiberglass because we wanted the boat to be lightweight.
The filleting material is made of epoxy and fibers to create a strong adhesive for filling in cracks similar to calking around a bathroom sink except that the filler material is extremely strong once it cures. I used a pre-made fillet blend until I ran out and then made my own with fiberglass fibers and epoxy. I recommend buying the pre-made fillet because it is perfectly consistent and too difficult to mimic.
To prepare the seams for filleting 1/8” holes were drilled about every inch along the outside edge of the floor and bottom of the side panels.
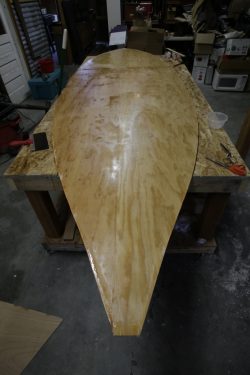
Three coats of a graphite powder/epoxy mixture made a scratch resistant bottom durable enough to withstand dragging the finished boat across a parking lot or crunching against river rocks. The graphite mixture was later added up to the chine line and the bow and stern for additional protection.
To get the shape of the boat bottom to bow upwards (called a rocker) on each end the center was fastened to the work bench by screwing it down and blocking the ends upward eight inches. Holes were drilled to match the edges of the side panels and zip ties pulled the edges together snugly so that the fillet material could be applied by pouring the thick paste into a 1 gallon zip lock bag and cutting one corner to make a sort of pastry bag but with fillet material. I used a plastic spoon to shape the fillet although there are specialty tools available for the task.
Test Runs and Adjustments
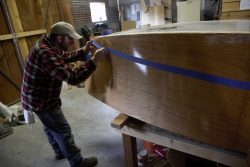
Slowly the boat began to take shape as we filleted the seams on the inside and rolled fiberglass tape across the outside edges. Every inch of the boat was coated with at least three coats of marine grade epoxy including the seats and gear trays we built.
It was fascinating to watch the boat materialize from the pile of materials. The gunwales were probably the most difficult part for us and required about 40 clamps. The one thing we had to borrow was clamps and lots of them. Even after scrounging up as many clamps as we could from friends and family we still were only able to work on one gunwale at a time.
As the boat took shape the accessories of the boat like oar locks and the anchor system had to be crafted without instructions. The sense of pride in crafting every part and piece of the boat led John who is a good metal worker to create his own. Although accessories can be purchased it was a huge cost savings to hand make them out of scrap material.
Finally the day came when after about 15 working days that was made up largely of evenings and weekends we tested the integrity of the boat by floating it on a small pond in John’s front yard. This allowed us to fine tune things like seat placement, oarlocks and to test out the anchor system. I attached a 30 pound lead anchor to the 3/8” nylon rope and we learned a lot about the boat just by paddling around for an hour or so with our kids.
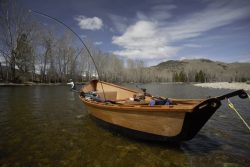
The real test came though when we launched it on the Bitterroot River and actually fished. The water is swift in places and the narrow river offers plenty of opportunity to practice avoiding obstacles like root wads and boulders. We were both impressed at how well the boat handled the rapids and how quickly it turned with stability.
A few weeks later on another fishing trip we had three grown men in the boat with gear and it still handled quite well. But when a big trout hit and the calamity of fighting a fish while getting pulled along the river took us by surprise the boat was pushed into a big tangle of trees. When we pushed off we learned why so many other boat builders had added a bumper plate. A small hole was found just above the chine line that required a repair and we cut out bumper plates for the sides that same day.

While the bumper pieces were an easy fix, adding fiber glass to the outside of the boat makes the boat really tough. It also adds somewhat to the weight though.
There were a few things in the boat plans that we did not do like adding a porthole cover to increase storage space but those things may be added later. John built a lean-bar of his own design that attaches to the front of the boat for fighting fish and casting. This feature is important for casting anglers especially on rivers that get a little rough.
Our first experience building a boat was enjoyable and the goal of building a lightweight drift boat that I could afford was met. But now that we have built one boat plans to build another one that is bigger and with more functional features are already being made.
If you want a functional boat for any purpose but have a limited budget building your own stitch and glue might be the answer. The design ideas and functionality of your boat are only limited by your imagination.
A fine resource for design ideas and boat building plans can be found at www.butlerprojects.com
Photo’s by John MacGillivray