 Turkey season is just two weeks away so I thought a review about patterning shotguns would be in order. I have found that very few shotgunners ever pattern their guns. Some of you might wonder why you should pattern a “scattergun.” Well, would you mount a scope on you rifle and go hunting without sighting it in, or take an open sighted gun to the field without knowing where the point of impact is? I hope not. Patterning a shotgun is basically the same thing as sighting in a rifle or handgun.
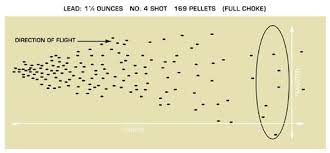
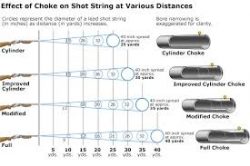
 Patterning a shotgun is simple, somewhat time consuming, and a little bit boring. The industry standard distance for patterning is 40 yards. Pattern densities for the various choke constrictions are measured at this distance. The number of pellets that hit inside a 30 inch circle at 40 yards divided by the number of pellets in the shot charge gives us a percentage that determines choke description. Here’s a list of shot percentages inside a 30 inch circle for the corresponding choke constriction.
• Full Choke: 70% or higher
• Improved Modified: 65%
• Modified: 55-60%
• Skeet No. 2: 55-60%
• Quarter Choke: 50%
• Improved Cylinder: 45%
• Skeet No. 1: 35-40%
• Cylinder: 35-40%
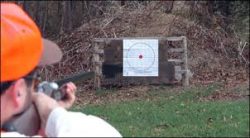
 For the average shooter, I recommend the following process to check the pattern of your shotgun. First you’ll need 6 sheets of paper or cardboard measuring 4’x4’. Draw a 4 to 6 inch circle in the middle of each sheet. You will be shooting one time at each sheet at 10, 30, and then 40 yards. Use a sight picture like the one shown in this post, the front bead of the shotgun pointed at the bottom of the circle. It will take a little time to shoot and then change the paper after each shot (the boring part), but when you are done you should have a pretty good idea just where the point of impact is in relation to your point of alignment.

 Remember that you are looking only at a 2 dimensional picture of your pattern. But in reality, your shot string travels in 3 dimensions; vertical axis, horizontal axis, and depth axis, or like the old math graph, x,y,z. Okay, now let’s look at our 2 ten yard patterns. These two should be nearly identical and centered on the spot we put in the middle of the paper.
 Depending on the choke you used your pattern will be about the size of a baseball (Full, IM, and Modified chokes) up to the size of a grapefruit (Cylinder, Skeet, and IC chokes). If your shot pattern is more than a couple inches left or right of center, shoot again, and recheck the patterns. If you are low or high by a few inches but vertically centered, you are probably in good shape and will be able to adjust your sight picture after we look at the patterns at the longer distances.
-
-
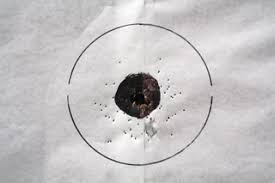
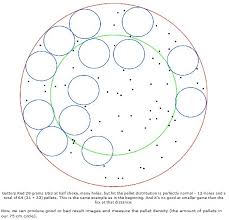
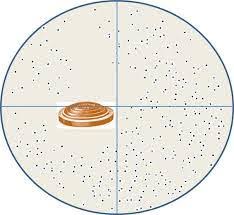
 Next, the 30 yard patterns; I really like this distance as it gives me a good picture of pattern density at a very common hunting range and also a highly useful clay target distance. In addition, I can get a really good comparison of point of impact (POI) location in relation to my point of alignment (POA). You might be a bit surprised at how much the shot spreads out in just another 20 yards from the 10 yard pattern. Find what appears to be the center of the pattern and draw a circle with a 15 inch radius around the pattern. Your pattern should be full and even throughout the 30 inch circle like pattern 1. If your pattern looks like it is full of what we call “holes” such as you see around the center; well, it’s a problem. You will need to do some more patterning work.
There are a few simple remedies for pattern “holes”. It is important to understand that similar to rifles and house cats, shotguns can at times be a bit finicky about their diet. A load that one gun “likes”, another might “hate.” Next week we’ll discuss some of the things we can try to get our shotgun tuned to deliver full and effective patterns. Until then, be safe and good shooting.
Be safe and good shooting.
Colonel Smoothbore