Dutch Oven baking is a wonderful camp cook skill. The whole point of camp cooking is to make delicious food, fast food, and wonderful dessert. Of course, you also need a constant pot of Cowboy Camp Coffee on the brew.
Dutch ovens make great vessels to slow cook an entire meal at one time. You can get Dutch Ovens in a variety of sizes, iron, aluminum, with feet or without. You will need a decent handle tool that helps you remove lids. I also carry a simple shovel to manipulate charcoal or coals as needed. 
A well-seasoned Dutch Oven is easy to clean. Sometimes, you will end up with some burn on the bottom. Most of my baking and cooking, in Dutch Ovens, gets added insert protection. I use a foil covering to keep the bottom and sides covered. An insert foil pie pan also works well. You can also use a pan that will fit inside the Dutch Oven. Parchment paper will also work on lower heat, slower fires.
If you drop a pan inside the oven, say to make cornbread, add several pebbles on the bottom of the oven. Adjust them to level the insert pan. This allows faster and more even convection cooking. I have also used this method to bake scallops, shrimp, and mussels. You get an even and quick cook.
Another trick is to grease the inside of the Dutch Oven. Now add a can of apple sauce or canned fruit. Cover the bottom for an inch or two. Now make your Gingerbread or any cake mix to add on top. The liquid bottom fruit and juice will keep the cake from burning. Serve the cake, with the fruit or applesauce, over top. You can always add some whip or ice cream as well.
A quick Cream Cheese icing is always a big hit. You can mix it ahead of time then spoon it on top the hot cake, buns, or cobbler.
Baked apples also are easy in a Dutch Oven. You can wrap the cored apples in foil, add some butter, sugar, and cinnamon/ nutmeg and set hole side up. I also use small pot pie foil pans to set the baked apples in. You can set several in the bottom of a large Dutch Oven.
Stacking an entire Dutch Oven meal is a wonderful way to test your campfire cooking expertise. Use the largest ovens on the bottom and the smallest on top. The course that takes the longest to cook goes on first and is on the bottom. This could be a stew, roast, or slow cooked meat dish. The next level will be the vegetables. Carrots and tates take longer to cook so cut them into pieces. The next step up can be cornbread or biscuits. Finally, the top tier of a dessert will cap off the stack. 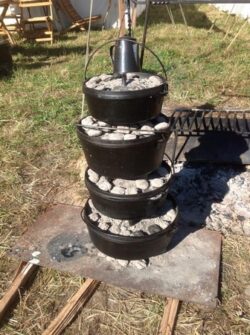
If you are limited with Dutch Ovens, foil wrap your veggies or Italian Brad and set them around the base of your oven and coals. A double wrap will help to keep them from leaking. In a pinch, wrap your potatoes in a coating of mud. Place the tates on the coals and occasionally turn. When the mud is caked and will crack off, the tate is done. To speed up the baked tate, add a steel nail through the middle of the tate.
Use your tools and shovel to manipulate and check the Dutch Ovens. A head lamp will help you see what is going on in the ovens and keep your hands free. As things finish cooking, set them to the side on a thin bed of coals. The Oven metal will retain heat for a good while.
Normally, I use wooden spoons, spatulas, and utensils to serve, scrape, stir, and scoop my meals. They protect the metal ovens and add a traditional presentation. I hand whittled my utensils, often at camp.
In some cases, hunters or fishermen are late coming bake to camp. Make a metal plate of dinner and place it in the oven, to keep it warm. They will be rewarded with a fast, hot meal.
Get Cookin Good Lookin!
Montana Grant