Fish derbies for kids are coming into season. For many new anglers, these may be their first hook ups! When you catch and keep these fish, try making some special memories. 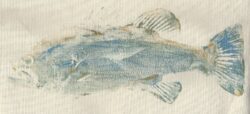
Fish print pictures, and fish print t-shirts, are a fun way to preserve their special catches. Here are some directions on how to make a mark and a memory with their fresh fish.
Fresh Fish prints are called “gyotakus” in Japan. Mounted fish artwork is way cheaper than taxidermy and highlights details of each print. Flat fish suck as panfish, flounder, bass, walleye, and crappies work best. The larger, scaled finned fish create sharper details. Trout and smoother skinned, smaller scaled fish will work but not as fine as bigger scalers.
There are several types of inks that will work. If you are planning to make a t-shirt, that will be washed, you will need a permanent craft ink. For an art print, a water-based printers’ ink will do the trick. Black is a common color, but you can get creative.
Use a 1-inch paintbrush, a fine brush for detail, cotton balls, two paper cups, (one for ink and one for water), toothpicks, old newspapers, a board bigger than the fish, and some rice paper. If you will be using a T-shirt, a plain white one will do. Maybe get the shirt sized a bit bigger so it will last into the future. I have also used old Styrofoam panels and trays to use as a work surface.
Step 1 Wash the fish with salt water which will remove the slime and mucous
Step 2 Place the fish on the open newspapers to dry. Paper towels will also help dry the fish
Step 3 Prop out the fins with a toothpick and support/ pin into position. You can secure the toothpick; on the side you will not be printing.
Step 4 Push small cotton balls into the gill side, that you plan to print. The cotton will prevent any internal fluids from getting onto your art. You may also use cotton balls to fix the mouth into a desired position.
Step 5 Place boards or small pieces of foam, wood, or… to position the fish appropriately. The fins will be lifted and supported. Let the fish sit for about 5 minutes.
Step 6 Use the 1-inch paint brush to cover the fish, fins, and head. Don’t paint the eye.
Step 7 Press the rice paper or t shirt against the fish. Be careful not to have folds on the paper or shirt. Press the paper or shirt with your fingers so that all the paint to fish to print is addressed. Pull the fabric or paper off the fish in one motion.
If the print is too dark, or light, adjust the amount of paint that you use on the fish. Now, add more fine detail using the fine brush. This is the perfect way to make the eye. 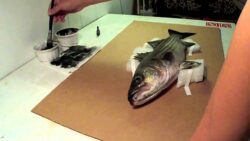
It is also a good idea to use a permanent marker to identify the angler, location, date, and any other relevant information.
Make a special memory!
Montana Grant